activity_main.xml
<?xml version="1.0" encoding="utf-8"?>
<LinearLayout
xmlns:android="http://schemas.android.com/apk/res/android"
xmlns:tools="http://schemas.android.com/tools"
android:id="@+id/root_layout"
android:layout_width="match_parent"
android:layout_height="match_parent"
android:orientation="vertical"
android:padding="16dp">
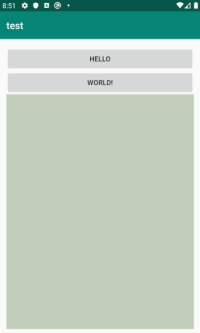
<Button
android:id="@+id/button1"
android:layout_width="match_parent"
android:layout_height="wrap_content"
android:text="Hello"/>
<Button
android:id="@+id/button2"
android:layout_width="match_parent"
android:layout_height="wrap_content"
android:text="World!"/>
<LinearLayout
android:id="@+id/fragment_container"
android:layout_width="match_parent"
android:layout_height="match_parent"
android:orientation="vertical"
android:background="#c1cfba"/>
</LinearLayout>
MainActivity.kt
package kr.co.test
import androidx.appcompat.app.AppCompatActivity
import android.os.Bundle
import kotlinx.android.synthetic.main.activity_main.*
class MainActivity : AppCompatActivity() {
override fun onCreate(savedInstanceState: Bundle?) {
super.onCreate(savedInstanceState)
setContentView(R.layout.activity_main)
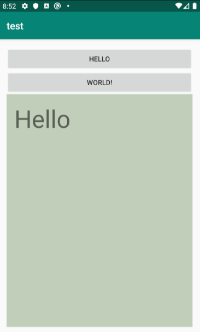
button1.setOnClickListener {
val button1Fragment = Button1Fragment()
val manager = supportFragmentManager
val transaction = manager.beginTransaction()
transaction.replace(R.id.fragment_container, button1Fragment)
transaction.addToBackStack(null)
transaction.commit()
}
button2.setOnClickListener {
val button2Fragment = Button2Fragment()
val manager = supportFragmentManager
val transaction = manager.beginTransaction()
transaction.replace(R.id.fragment_container, button2Fragment)
transaction.addToBackStack(null)
transaction.commit()
}
}
}
fragment_button1.xml
<?xml version="1.0" encoding="utf-8"?>
<LinearLayout
    xmlns:android="http://schemas.android.com/apk/res/android"
    android:layout_width="match_parent"
    android:layout_height="match_parent"
    android:orientation="vertical"
    android:padding="16dp">

    <TextView
        android:id="@+id/button1_text_view"
        android:layout_width="wrap_content"
        android:layout_height="wrap_content"
        android:text="Hello"
        android:textSize="50sp" />

</LinearLayout>
Button1Fragment.kt
package kr.co.test

import android.graphics.Color
import android.os.Bundle
import android.view.LayoutInflater
import android.view.View
import android.view.ViewGroup
import android.widget.TextView
import android.widget.Toast
import androidx.fragment.app.Fragment

class Button1Fragment : Fragment(){

    override fun onCreateView(inflater: LayoutInflater, container: ViewGroup?, savedInstanceState: Bundle?): View? {
        val view = inflater.inflate(R.layout.fragment_button1, container, false)
        val tv = view.findViewById<TextView>(R.id.button1_text_view)

        tv.setOnClickListener{
            tv.setTextColor(Color.RED)
            Toast.makeText(view.context,"TextView clicked.", Toast.LENGTH_SHORT).show()
        }

        return view
    }
}
fragment_button2.xml
<?xml version="1.0" encoding="utf-8"?>
<LinearLayout
    xmlns:android="http://schemas.android.com/apk/res/android"
    android:layout_width="match_parent"
    android:layout_height="match_parent"
    android:orientation="vertical"
    android:padding="16dp">

    <TextView
        android:id="@+id/button2_text_view"
        android:layout_width="wrap_content"
        android:layout_height="wrap_content"
        android:text="World!"
        android:textSize="50sp" />

</LinearLayout>
Button2Fragment.kt
package kr.co.test

import android.graphics.Color
import android.os.Bundle
import android.view.LayoutInflater
import android.view.View
import android.view.ViewGroup
import android.widget.TextView
import android.widget.Toast
import androidx.fragment.app.Fragment

class Button2Fragment : Fragment(){

    override fun onCreateView(inflater: LayoutInflater, container: ViewGroup?, savedInstanceState: Bundle?): View? {
        val view = inflater.inflate(R.layout.fragment_button2, container, false)
        val tv = view.findViewById<TextView>(R.id.button2_text_view)

        tv.setOnClickListener{
            tv.setTextColor(Color.GREEN)
            Toast.makeText(view.context,"TextView clicked.", Toast.LENGTH_SHORT).show()
        }

        return view
    }
}
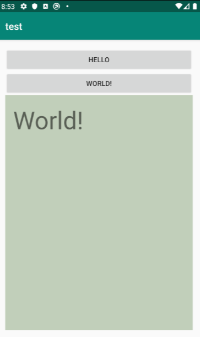
결과
참고사이트
https://android--code.blogspot.com/2018/02/android-kotlin-fragment-example.html